Starting Secure Connect
After installing Secure Connect on your PC, you can start it in two ways:
- Starting via Web
- Starting directly
Starting via Web
This section describes how to start Secure Connect via Web based on the three authentication methods configured on the server. For the Username/Password + Digital Certificate authentication, the digital certificate can either be the USB Key certificate provided by the vendor, or the file certificate provided by the administrator.
Starting via Web (Username/Password)
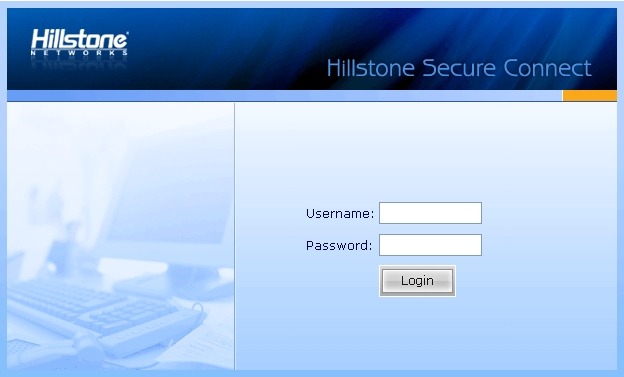
When the Username/Password authentication is configured on the server, to start Secure Connect via web, take the following steps:
- Type the URL https://IP-Address:Port-Number into the address bar of your web browser.
- In the login page shown below, type the username and password into the Username and Password boxes respectively, and then click Login.
If local authentication server is configured on the device, the username and password should be configured before on the device;
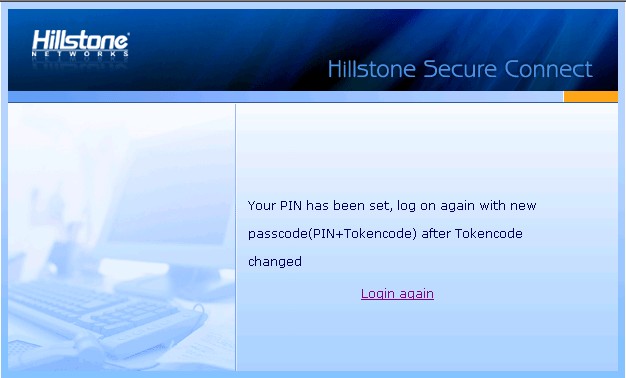
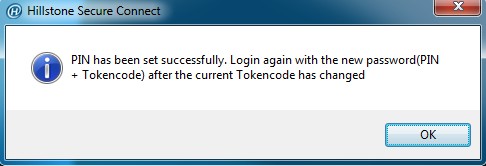
If “Radius authentication + RSA SecurID Token authentication by RSA Server” is configured on the device, and the user logs in for the first time, the username should be the username configured on the Radius server, and the password should be the dynamic Token password being bound to the user. Click Login, and in the PIN Setting page (shown in Figure 2), set a PIN (4 to 8 digits, the first digit should not be 0). After the PIN has been set successfully, you will be prompted to login again with the new password (shown in Figure 3). Click Login again to return to the login page, type the correct username and new password, and click Login. The new password is PIN + dynamic Token password. For example, if the PIN is set to 54321, and the dynamic Token password is 808771, then the new password is 54321808771;
If “Radius authentication + RSA SecurID Token authentication by RSA Server” is configured on the device, but the user is not logging in for the first time, the username should be the username configured on the Radius server, and the password should be PIN + dynamic Token password.
Figure 1: Login
Tip: You can customize this login page by changing the background picture. For more information, see SCVPN Login Page.
Figure 2: PIN Setting
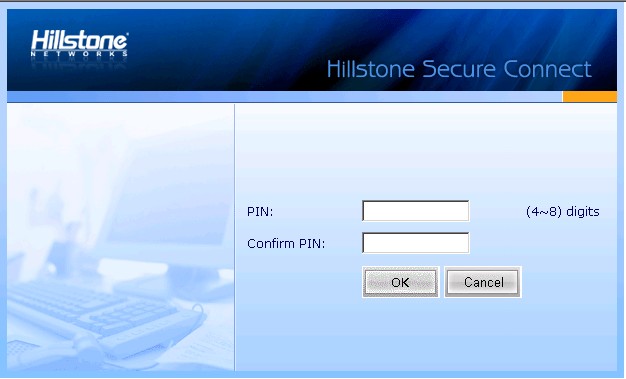
Figure 3: Login Again with the New Password
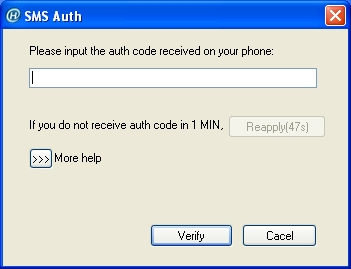
- If the SMS authentication function is enabled, type the SMS authentication code into the box, and then click Authenticate. If you have not received the code in one minute, you can re-apply.
Tips:
- After passing the authentication, you have three chances to type the authentication code. If you give incorrect authentication code three times in succession, the connection will be disconnected automatically.
- You have three chances to apply the authenticate code, and the sending interval is one minute. Re-applying authentication code will void the old code, thus you must provide the latest code to pass the authentication.
Finishing the above steps, the client will connect to the server automatically. After the connection has been established successfully, the icon  will be displayed in the notification area. And the encrypted communication between the client and server can be implemented now.
Starting via Web (Username/Password + USB Key Certificate)
When the Username/Password + Digital Certificate authentication is configured on the server, for the USB Key certificate, to start Secure Connect via web, take the following steps:
- Insert the USB Key to the USB port of the PC.
- Type the URL https://IP-Address:Port-Number into the address bar of your web browser.
- In the Select Digital Certificate dialog, select the digital certificate you want and click OK. In the Enter Password dialog, provide the UKey user password (1111 by default) and click OK.
Tip: To use Hillstone UKey, the Hillstone UKey driver and administrator software are also needed. For more information about Hillstone UKey, see Hillstone UKey User's Guide.
- In the SCVPN login page shown below, type the username and password into the Username and Password boxes respectively, and then click Login. The login user should be configured before on the device.
Tip: You can customize this login page by changing the background picture. For more information, see SCVPN Login Page.
- If the SMS authentication function is enabled, type the SMS authentication code into the box, and then click Authenticate. If you have not received the code in one minute, you can re-apply.
Tips:
- After passing the authentication, you have three chances to type the authentication code. If you give incorrect authentication code three times in succession, the connection will be disconnected automatically.
- You have three chances to apply the authenticate code, and the sending interval is one minute. Re-applying authentication code will void the old code, thus you must provide the latest code to pass the authentication.
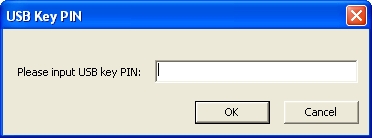
- In the USB Key PIN dialog shown below, type the UKey PIN (1111 by default), and click OK.
Finishing the above steps, the client will connect to the server automatically. After the connection has been established successfully, the icon will be displayed in the notification area. And the encrypted communication between the client and server can be implemented now.
Starting via Web (Username/Password + File Certificate)
When the Username/Password + Digital Certificate authentication is configured on the server, for the file certificate, to start Secure Connect via web, take the following steps:
- Import the file certificate provided by the administrator manually.
- Type the URL https://IP-Address:Port-Number into the address bar of your web browser.
- In the Select Digital Certificate dialog, select the digital certificate you want and click OK.
- In the SCVPN login page shown below, type the username and password into the Username and Password boxes respectively, and then click Login. The login user should be configured before on the device.
Tip: You can customize this login page by changing the background picture. For more information, see SCVPN Login Page.
- If the SMS authentication function is enabled, type the SMS authentication code into the box, and then click Authenticate. If you have not received the code in one minute, you can re-apply.
Tips:
- After passing the authentication, you have three chances to type the authentication code. If you give incorrect authentication code three times in succession, the connection will be disconnected automatically.
- You have three chances to apply the authenticate code, and the sending interval is one minute. Re-applying authentication code will void the old code, thus you must provide the latest code to pass the authentication.
Finishing the above steps, the client will connect to the server automatically. After the connection has been established successfully, the icon will be displayed in the notification area. And the encrypted communication between the client and server can be implemented now.
Starting via Web (USB Key Certificate Only)
When the Digital Certificate Only authentication is configured on the server, for the USB Key certificate, to start Secure Connect via web, take the following steps:
- Insert the USB Key to the USB port of the PC.
- Type the URL https://IP-Address:Port-Number into the address bar of your web browser.
- In the Select Digital Certificate dialog, select the digital certificate you want and click OK. In the Enter Password dialog shown below, provide the UKey user password (1111 by default) and click OK.
Tip: To use Hillstone UKey, the Hillstone UKey driver and administrator software are also needed. For more information about Hillstone UKey, see Hillstone UKey User's Guide.
- In the USB Key PIN dialog shown below, type the UKey PIN (1111 by default), and click OK.
Finishing the above steps, the client will connect to the server automatically. After the connection has been established successfully, the icon will be displayed in the notification area. And the encrypted communication between the client and server can be implemented now.
Starting via Web (File Certificate Only)
When the Digital Certificate Only authentication is configured on the server, for the file certificate, to start Secure Connect via web, take the following steps:
- Import the file certificate provided by the administrator manually.
- Type the URL https://IP-Address:Port-Number into the address bar of your web browser.
- In the Select Digital Certificate dialog, select the digital certificate you want and click OK.
Finishing the above steps, the client will connect to the server automatically. After the connection has been established successfully, the icon will be displayed in the notification area. And the encrypted communication between the client and server can be implemented now.
Starting Directly
This section describes how to start Secure Connect directly based on the three authentication methods configured on the server. For the Username/Password + Digital Certificate authentication, the digital certificate can either be the USB Key certificate provided by the vendor, or the file certificate provided by the administrator.
Starting Directly (Username/Password)
When the Username/Password authentication is configured on the server, to start Secure Connect directly, take the following steps:
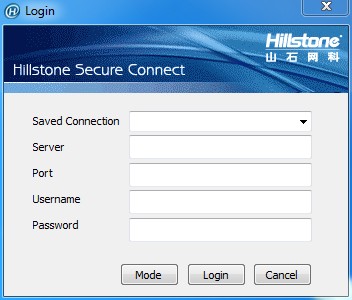
- In your PC, double click the shortcut to Hillstone Secure Connect on your desktop, or from the Start menu, click All Programs > Hillstone Secure Connect > Hillstone Secure Connect.
- In the Login dialog, click Mode. In the Login Mode dialog shown below, click Username/Password, and then click OK.

- In the Login dialog of the Username/Password authentication mode (shown in Figure 1), configure the options to login.
If local authentication server is configured on the device, the username and password should be configured before on the device;
If “Radius authentication + RSA SecurID Token authentication by RSA Server” is configured on the device, and the user logs in for the first time, the username should be the username configured on the Radius server, and the password should be the dynamic Token password being bound to the user. Click Login, and in the PIN Setting page (shown in Figure 2), set a PIN (4 to 8 digits, the first digit should not be 0). After the PIN has been set successfully, you will be prompted to login again with the new password (shown in Figure 3). Click Login again to return to the login page, type the correct username and new password, and click Login. The new password is PIN + dynamic Token password. For example, if the PIN is set to 54321, and the dynamic Token password is 808771, then the new password is 54321808771;
If “Radius authentication + RSA SecurID Token authentication by RSA Server” is configured on the device, but the user is not logging in for the first time, the username should be the username configured on the Radius server, and the password should be PIN + dynamic Token password.
Figure 1 Username/Password Mode Login
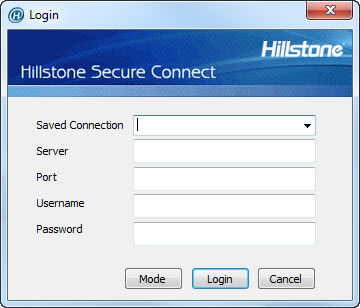
- Saved Connection: Provides the connection information you have filled before. Select a connection from the drop-down list. For more information about the login options, see Configuring Secure Connect.
- Server: Enter the IP address of SCVPN server.
- Port: Enter the HTTPS port number of SCVPN server.
- Username: Enter the name of the login user.
- Password: Enter the password of the login user.
Figure 2: PIN Setting
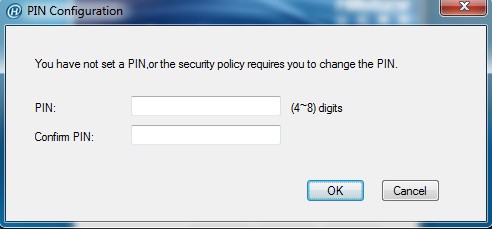
Figure 3: Login Again with the New Password
- Click Login. If SMS authentication is enabled, type the authentication code into the box in the SMS Auth dialog (as shown below) and click Verify. If you have not received the authentication code in one minute, you can re-apply by clicking Reapply.
Finishing the above steps, the client will connect to the server automatically. After the connection has been established successfully, the icon will be displayed in the notification area. And the encrypted communication between the client and server can be implemented now.
Starting Directly (Username/Password + USB Key Certificate)
When the Username/Password + Digital Certificate authentication is configured on the server, for the USB Key certificate, to start Secure Connect via web, take the following steps:
- Insert the USB Key to the USB port of the PC.
- In your PC, double click the shortcut to Hillstone Secure Connect on your desktop, or from the Start menu, click All Programs > Hillstone Secure Connect > Hillstone Secure Connect.
- In the Login dialog, click Mode. In the Login Mode dialog, first click Username/Password + Digital Certificate, and if necessary, click Select Cert. In the Select Certificate dialog shown below, select a USB Key certificate. If the USB Key certificate is not listed, click Update. The client will send the selected certificate to the server for authentication. Finally click OK.
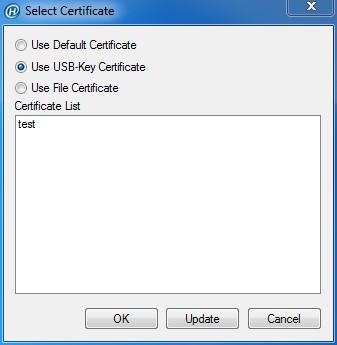
- Use Default Certificate: Select the checkbox to use the default certificate for authentication. Hillstone devices use the certificate in Hillstone UKey as the default certificate. This is the default option.
- Use USB-Key Certificate: Select the checkbox to use the USB-Key certificate for authentication.
- Use File Certificate: Select the checkbox to use the file certificate for authentication.
- Certificate List: Lists all the certificates in the system. You can choose the certificate you want from the list.
Tip: You can use the USB Key deployment tool named SelectUSBKey to set the third-party certificate as the default certificate. For more information about the tool, see Third-party USB Key.
- In the Login dialog of the Username/Password + Digital Certificate authentication mode (as shown below), configure the options to login.

- Saved Connection: Provides the connection information you have filled before. Select a connection from the drop-down list. For more information about the login options, see Configuring Secure Connect.
- Server: Enter the IP address of SCVPN server.
- Port: Enter the HTTPS port number of SCVPN server.
- Username: Enter the name of the login user.
- Password: Enter the password of the login user.
- USB Key PIN: Enter the PIN code of the USB Key (1111 by default). One USB Key only corresponds to one password.
- Click Login. If SMS authentication is enabled, type the authentication code into the box in the SMS Auth dialog (as shown below) and click Verify. If you have not received the authentication code in one minute, you can re-apply by clicking Reapply.
Finishing the above steps, the client will connect to the server automatically. After the connection has been established successfully, the icon will be displayed in the notification area. And the encrypted communication between the client and server can be implemented now.
Starting Directly (Username/Password + File Certificate)
When the Username/Password + Digital Certificate authentication is configured on the server, for the file certificate, to start Secure Connect via web, take the following steps:
- Import the file certificate provided by the administrator manually.
- In your PC, double click the shortcut to Hillstone Secure Connect on your desktop, or from the Start menu, click All Programs > Hillstone Secure Connect > Hillstone Secure Connect.
- In the Login dialog, click Mode. In the Login Mode dialog, first click Username/Password + Digital Certificate, and if necessary, click Select Cert. In the Select Certificate dialog shown below, select a file certificate. If the file certificate is not listed, click Update. The client will send the selected certificate to the server for authentication. Finally click OK.
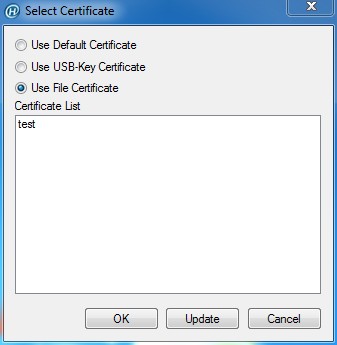
- Use Default Certificate: Select the checkbox to use the default certificate for authentication. Hillstone devices use the certificate in Hillstone UKey as the default certificate. This is the default option.
- Use USB-Key Certificate: Select the checkbox to use the USB-Key certificate for authentication.
- Use File Certificate: Select the checkbox to use the file certificate for authentication.
- Certificate List: Lists all the certificates in the system. You can choose the certificate you want from the list.
- In the Login dialog of the Username/Password + Digital Certificate authentication mode (as shown below), configure the options to login.
- Saved Connection: Provides the connection information you have filled before. Select a connection from the drop-down list. For more information about the login options, see Configuring Secure Connect.
- Server: Enter the IP address of SCVPN server.
- Port: Enter the HTTPS port number of SCVPN server.
- Username: Enter the name of the login user.
- Password: Enter the password of the login user.
- Click Login. If SMS authentication is enabled, type the authentication code into the box in the SMS Auth dialog (as shown below) and click Verify. If you have not received the authentication code in one minute, you can re-apply by clicking Reapply.
Finishing the above steps, the client will connect to the server automatically. After the connection has been established successfully, the icon will be displayed in the notification area. And the encrypted communication between the client and server can be implemented now.
Starting Directly (USB Key Certificate Only)
When the Digital Certificate Only authentication is configured on the server, for the USB Key certificate, to start Secure Connect via web, take the following steps:
- Insert the USB Key to the USB port of the PC.
- In your PC, double click the shortcut to Hillstone Secure Connect on your desktop, or from the Start menu, click All Programs > Hillstone Secure Connect > Hillstone Secure Connect.
- In the Login dialog, click Mode. In the Login Mode dialog, first click Digital Certificate Only, and if necessary, click Select Cert. In the Select Certificate dialog shown below, select a USB Key certificate. If the USB Key certificate is not listed, click Update. The client will send the selected certificate to the server for authentication. Finally click OK.
- Use Default Certificate: Select the checkbox to use the default certificate for authentication. Hillstone devices use the certificate in Hillstone UKey as the default certificate. This is the default option.
- Use USB-Key Certificate: Select the checkbox to use the USB-Key certificate for authentication.
- Use File Certificate: Select the checkbox to use the file certificate for authentication.
- Certificate List: Lists all the certificates in the system. You can choose the certificate you want from the list.
Tip: You can use the USB Key deployment tool named SelectUSBKey to set the third-party certificate as the default certificate. For more information about the tool, see Third-party USB Key.
- In the Login dialog of the Digital Certificate Only authentication mode (as shown below), configure the options to login.

- Saved Connection: Provides the connection information you have filled before. Select a connection from the drop-down list. For more information about the login options, see Configuring Secure Connect.
- Server: Enter the IP address of SCVPN server.
- Port: Enter the HTTPS port number of SCVPN server.
- USB Key PIN: Enter the PIN code of the USB Key (1111 by default). One USB Key only corresponds to one password.
- Finishing the above configuration, click Login.
Finishing the above steps, the client will connect to the server automatically. After the connection has been established successfully, the icon will be displayed in the notification area. And the encrypted communication between the client and server can be implemented now.
Starting Directly (File Certificate Only)
When the Digital Certificate Only authentication is configured on the server, for the file certificate, to start Secure Connect via web, take the following steps:
- Import the file certificate provided by the administrator manually.
- In your PC, double click the shortcut to Hillstone Secure Connect on your desktop, or from the Start menu, click All Programs > Hillstone Secure Connect > Hillstone Secure Connect.
- In the Login dialog, click Mode. In the Login Mode dialog, first click Digital Certificate Only, and if necessary, click Select Cert. In the Select Certificate dialog shown below, select a file certificate. If the file certificate is not listed, click Update. The client will send the selected certificate to the server for authentication. Finally click OK.
- Use Default Certificate: Select the checkbox to use the default certificate for authentication. Hillstone devices use the certificate in Hillstone UKey as the default certificate. This is the default option.
- Use USB-Key Certificate: Select the checkbox to use the USB-Key certificate for authentication.
- Use File Certificate: Select the checkbox to use the file certificate for authentication.
- Certificate List: Lists all the certificates in the system. You can choose the certificate you want from the list.
- In the Login dialog of the Digital Certificate Only authentication mode (as shown below), configure the options to login.

- Saved Connection: Provides the connection information you have filled before. Select a connection from the drop-down list. For more information about the login options, see Configuring Secure Connect.
- Server: Enter the IP address of SCVPN server.
- Port: Enter the HTTPS port number of SCVPN server.
- Finishing the above configuration, click Login.
Finishing the above steps, the client will connect to the server automatically. After the connection has been established successfully, the icon will be displayed in the notification area. And the encrypted communication between the client and server can be implemented now.