Service/Network Node Monitor
Monitor > Service/Network Node
The Service/Network Node page displays the latency of the service node that connects to the current Hillstone device and the latency and packet loss rate of the network node.
In the Service/Network Node page, you can perform the following actions:
- Select the Topology mode or the Table mode to view all configured service nodes and network nodes. When selecting the Topology mode, you can click Firewall to quickly locate the Hillstone device node with highlighting it, click Zoom In to expand the topology, or click Zoom Out to decrease.
- In the
 drop-down menu, select Network Nodes or Service Nodes. The corresponding information will be displayed in the table or the topology diagram. To search the desired nodes, input the node name, IP address, or domain name in the textbox and then click Search. The nodes that meet the searching conditions will be displayed in the table or the topology diagram.
- Click Configure Node. The Node Configuration panel appears. You can select a node and then configure its settings in this panel.
- At the top-right corner, click the Warning Rule Configuration button (
 ) to configure the warning rules. With the warning rules configured, when events that match the warning rules happen, the system will generate the warning information. For details on configuring warning rules, see Warning Rule Configuration.
- In the latency history trend chart that is located at the bottom of this page, click
 at the top-right corner to expand the chart or click
  to hide the chart.
Configuring Service/Network Nodes
After clicking the Configure Node button, the Node Configuration mode is active and the Node Configuration panel appears. Based on your topology, hover your mouse over a desired node and click the newly appeared  icon to add a new node. Then the Node Configuration dialog appears for your configuring. After creating the new node, it will be displayed behind the desired node.
In the Node Configuration dialog, you can perform the following actions:
- Select the Topology mode or the Table mode to view all configured service nodes and network nodes. When selecting the Topology mode, you can click Located to the selected Node to quickly locate the selected node with highlighting it and place it in the center of the page, click Zoom In to expand the topology chart, or click Zoom Out to decrease the topology chart.
- In the drop-down menu, select Network Nodes or Service Nodes. The corresponding information will be displayed in the table or the topology diagram. To search the desired nodes, input the node name, IP address, or domain name in the textbox and then click Search. The nodes that meet the searching conditions will be displayed in the table or the topology diagram.
- Click Clear to delete all nodes.
- At the top-right cornet, click the Warning Rule Configuration button () to configure the warning rules. With the warning rules configured, when events that match the warning rules happen, the system will generate the warning information. For details on configuring warning rules, see Warning Rule Configuration.
Optoions in the Node Configuration dialog:
| Option |
Description |
| Name |
Specify the name of the service/network node to be created.
|
| Address |
Specify the address of the service/network node.
|
| Interface |
Specify the interface that connects to the new node. |
| Detection Frequency |
Specify the detection frequency. The range is from 15s to 120s. The default value is 30s.
|
| Type |
Specify the detection type. You can choose one type from the following options:
- ICMP.
- HTTP. When selecting HTTP, proceed to enter the port and the URL.
- FTP. When selecting FTP, proceed to enter the port. To configure the advanced settings, select the Advanced checkbox to provide the username and password for logging into the FTP server and enter the path or file name in the FTP server.
- SMTP. When selecting SMTP, proceed to enter the port.
- POP3. When selecting POP3, proceed to enter the port.
- IMAP4. When selecting IMAP4, proceed to enter the port.
- DNS. When selecting DNS, proceed to enter the port and the domain name.
- LDAP. When selecting LDAP, proceed to enter the port. To configure the advanced settings, select the Advanced checkbox to provide the username and password for logging into the LDAP server.
- Customize. When selecting Customize, proceed to select TCP or UDP and then specify the corresponding port.
|
| Test |
Click Test to test whether the node is reachable or the service is available.
|
After creating the node, you can modify the configurations if required. Select it and modify the parameters in the right Node Configuration panel. Then click Save to save the modifications.
After completing the configurations, click Return at the top-right corner to quit the Node Configuration mode.
Note: The system can at most support 100 nodes.
Viewing Monitoring Results
In the Service/Network Node page, you can view the monitoring results using following methods:
- Use the topology or the table to view the name, detection type, interface, latency, packet loss rate (of network nodes), and health status of the nodes.
- Select a node to view the latency/packet loss rate history trend during the latest 1 hour at the bottom of the page.
- Select a node and click at the top-right corner of the history trend chart to expand this chart.
After expanding the chart, you can perform the following actions in the expanded chart:
- In the
 drop-down menu, select Latest 1 Hour, Latest 1 Day, Latest 1 Week, Latest 1 Month, and Customize to display the statistics during the selected period of time. When selecting Customize, you can specify the time cycle accordingly in the newly appeared window. The maximum time cycle is 30 days.
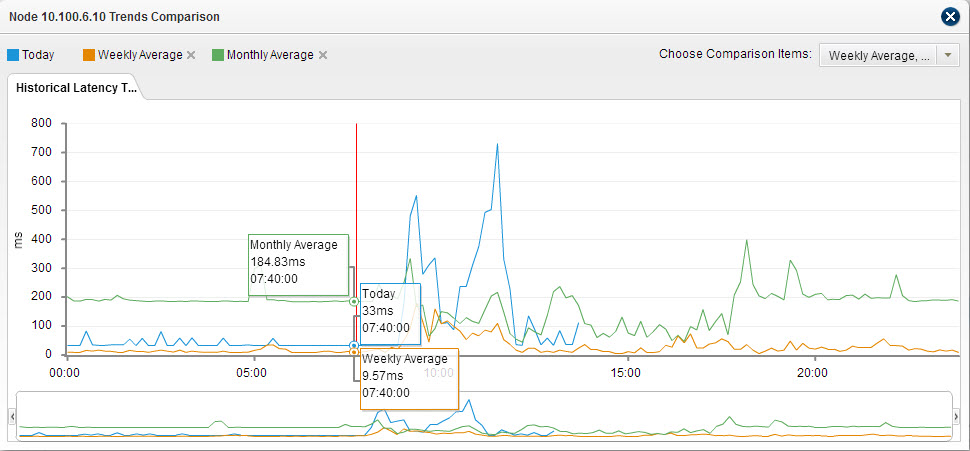
- Click Compare. The Trend Comparison window appears. Choose comparison items from the Choose Comparison Items drop-down menu. The system will display today's history trend and the history trend of the selected items in the trend comparison chart.
- To close the expanded page and return to the Topology mode or the Table mode, click the Return button at the top-right corner.