HA Configuration Example: Active-Passive (A/P) Mode
This section describes a typical HA Active-Passive mode configuration example.
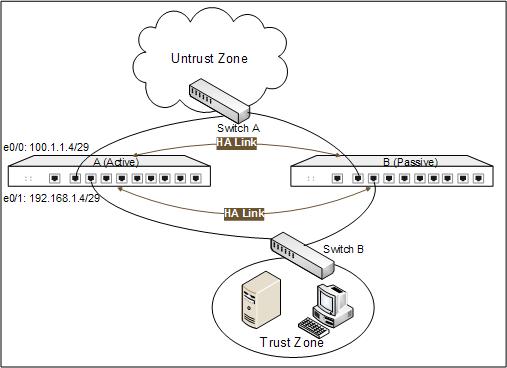
Two security devices using the same hardware platform, firmware version, VR, anti-virus license and anti-virus configurations, construct the HA Active-Passive mode, and the two devices use the same interface to connect the network.
Device A is elected as the primary device to forward traffic, and Device B is the backup device. Device A will synchronizate its configuration information and status information to Device B. When Device A fails or the ethernet0/0 of Device A disconnects, Device B will take over the work of Device A and be selected as primary device to forward traffic.
See the topology below:

Take the following steps:
Step 1: Configure a track object which is used for tracking the status of interface of Device A, and if the interface ethernet0/0 fails, the device will implement failover.
- Select Objects > Track Object from the menu bar.
- In the Track Object dialog, click New.
- In the Track Object Configuration dialog, configure the options as below:
- Name: trackobj1
- Threshold: 255
- Type: Click Interface and then click Add
- Interface: ethernet0/0
- Weight: 255
- Click OK to return to the Track Object dialog.
Step 2: Configure HA groups.
Device A
- Select System > HA from the menu bar.
- Under Group0 in the HA dialog, configure the options as below:
- Priority: 10
- Track Object: trackobj1
- Click OK to save your settings.
Device B
- Select System > HA from the menu bar.
- Under Group0 in the HA dialog, select 100 in the Priority box.
- Click OK to save your settings.
Step 3: Configure interfaces and policies of Device A.
- On the Navigation pane, click Configure > Network > Network to visit the Network page.
- Select ethernet0/0 from the interface list, and click Edit.
- In the Interface Configuration dialog, configure the options as below:
- Binding zone: Layer 3 zone
- Zone: untrust
- Type: Static IP
- IP address: 100.1.1.4
- Netmask: 29
- Click OK to save the changes and return to the Network page.
- Select ethernet0/1 from the interface list, and click Edit.
- In the Interface Configuration dialog, configure the options as below:
- Binding zone: Layer 3 zone
- Zone: trust
- Type: Static IP
- IP address: 192.168.1.4
- Netmask: 29
- Click OK to save the changes and return to the Network page.
- On the Navigation pane, click Configure > Security > Policy to visit the Policy page.
- Click New. In the Policy Configuration dialog, configure the options as below:
- Src zone: trust
- Dst zone: untrust
- Src address: Any
- Dst address: Any
- Service: Any
- Action: Permit
- Click OK to save the changes and return to the Policy page.
Step 4: Configure HA link interfaces and enable HA.
Device A
- Select System > HA from the menu bar.
- In the HA dialog, configure the options as below:
- Link interface 1: ethernet0/2
- Interface 2: ethernet0/3
- IP address: 1.1.1.1/24
- HA cluster ID: 1
- Click OK to save your changes.
Device B
- Select System > HA from the menu bar.
- In the HA dialog, configure the options as below:
- Link interface 1: ethernet0/2
- Interface 2: ethernet0/3
- IP address: 1.1.1.2/24
- HA cluster ID: 1
- Click OK to save your changes.
Step 5: Configure the management IP of the primary device and backup device after synchronization.
Device A
- On the Navigation pane, click Configure > Network > Network to visit the Network page.
- Select ethernet0/1 from the interface list, and click Edit.
- Under IP configuration in the Interface Configuration dialog, click Advanced.
- In the Advanced dialog, type 192.168.1.253 into IP address box.
- Click OK to save your settings and return to Interface Configuration dialog.
- Click OK to save your settings and return to the Network page.
Device B: Use the same method to configure the management IP of Device B. Configure the managemenet IP of ethernet0/1 of Device B to 192.168.1.254.

