Example 1 (Username/Password)
This section describes a SCVPN example with the username/password authentication method.
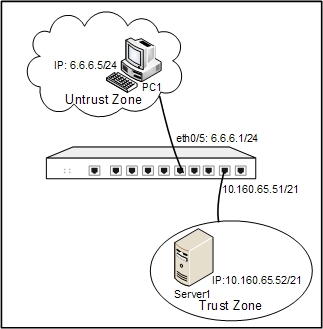
Server1 (10.160.65.52/21) in the intranet is protected by a security device. PC1 (6.6.6.5/24) in Internet wants to visit the resources on Server1 (10.160.65.52/21). It is required to control the access by encrypting the data by SCVPN with the username/password authentication method.
The topology is shown as below:
Take the following steps:
Step 1: Create local users.
- Select Objects > Local User from the menu bar.
- Select local from the Local server drop-down list. Click New > User. In the User Configuration dialog, configure the options as below:
- Name: user1
- Password: password1
- Confirm password: password1
- Click OK to save the settings.
Step 2: Configure the SCVPN address pool.
- On the Navigation pane, click Configure > Network > SSL VPN to visit the SSL VPN page.
- On the Task tab in the right auxiliary pane, click Address Pool to visit the Address pool page.
- Click New. On the Basic tab in the Address Pool Configuration dialog, configure the options as below:
- Name: pool1
- Start IP: 20.1.1.1
- End IP: 20.1.1.255
- Netmask: 255.255.255.0
- DNS1: 20.1.1.3
- WINS1: 20.1.1.2
- Click OK to save the settings.
Step 3: Create the tunnel interface (the IP address of the tunnel interface must be in the same network segment with the address pool).
- On the Navigation pane, click Configure > Network > Network to visit the Network page.
- Click New on the upper-left of the zone list. In the Zone Configuration dialog, configure the options as below:
- Name: VPN
- Type: Layer 3 zone
- Click OK to save the settings and return to the Network page.
- Click New > Tunnel Interface on the upper-left of the interface list. On the General tab in the Interface Configuration dialog, configure the options as below:
- Name: tunnel1
- Binding zone: Layer 3 zone
- Zone: VPN
- Type: Static IP
- IP Address: 20.1.1.101
- Netmask: 24
- Click OK to save the settings.
Step 4: Configure SCVPN server.
- On the Navigation pane, click Configure > Network > SSL VPN to visit the SSL VPN page.
- Click New.
- In the Welcome page of the SSL VPN Configuration dialog, Type ssl1 into the SSL VPN name box.
- Click Next. In the User page, select local from the AAA server drop-down list, and then click Add.
- Click Next. In the Interface page, configure the options as below:
- Interface 1: ethernet0/5
- Service port: 4433
- Tunnel interface: tunnel1
- Address pool: pool1
- Click Next. In the Policy/Route page, type 10.160.64.0 and 255.255.248.0 into the IP and Netmask boxes respectively, and then click Add.
- Click OK to save the settings.
Step 5: Edit the policy rule from VPN to Any.
- On the Navigation pane, click Configure > Security > Policy to visit the Policy page.
- Select VPN and Any from the Src zone and Dst zone drop-down list respectively. Select the filtered policy rule, and click Edit. In the Policy Configuration dialog, modify Dst zone from Any to trust.
- Click OK to save the changes.
Step 6: In the web browser of PC1, visit https://6.6.6.1:4433, and in the login page, type user1 and password1 into the Username and Password boxes. After the authentication, download and install SCVPN client.
Step 7: Login with SCVPN client, and now PC1 can access the resources in the trust zone through SCVPN tunnel.