SSL Proxy Configuration Example
This section describes a SSL proxy example.
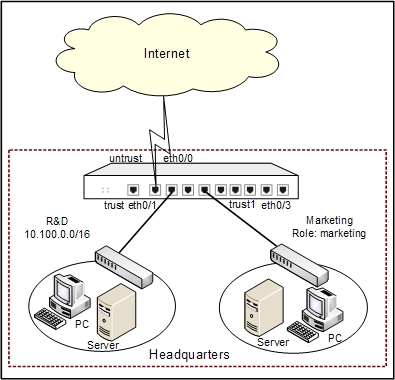
The security appliance works as the gateway of an enterprise. Ethernet0/0 connects to Internet and belongs to untrust zone; ethernet0/1 connects to the Intranet of R&D department and belongs to trust zone; ethernet0/3 connects to the Intranet of Marketing department and belongs to the trust1 zone. See the topology below:

It is required to block the mails containing the word X sent by Gmail and log the action.
This section shows the SSL proxy and email filter configurations in details, and for the configurations of interface, zone, and log, see the related chapters.
Take the following steps:
Step 1: Import the local certificate of the device to the client browser (take IE as the example).
- Export the local certificate to local PC. Select Objects > PKI from the menu bar. On the Management tab in the PKI Management dialog, configure the options as below:
- Trust domain: trust_domain_ssl_proxy
- Content: Local certificate
- Action: Export
Click OK and select a path to save the certificate.
- Import the certificate to IE. Open IE, from the toolbar, select Tools > Internet Options. On the Content tab, click Certificates. In the Certificates dialog, click the Trusted Root Certification Authorities tab, and then click Import. Import the certificate following the Certificate Import Wizard.
Step 2: Get the CommonName field of Gmail website.
- On the Navigation pane, click Configure > Content > Web Content/Web Posting/Email Filter to visit the corresponding page.
- On the Task tab in the right auxiliary pane, click SSL Proxy.
- In the SSL Proxy dialog, select the Enable check box for HTTPS access audit.
- Select Only audit websites in the following list from the Method drop-down list, but do not add any website.
- Click Set for User to configure the users that will be audited in the Audit User Configuration dialog.
- Click OK to save the settings and return to the previous dialog.
- Visit www.gmail.com with IE.
- On the Navigation pane, click Log > Attack Log > Security to visit the security log page. You can get the CommonName field in the security log list. The CommonName fields of www.gmail.com include www.google.com, *.mail.google.com, *.google.com, www.googleadservices.com, *.google-analytics.com, and mail.google.com.
Step 3: Configure SSL proxy.
- On the Navigation pane, click Configure > Content > Web Content/Web Posting/Email Filter to visit the corresponding page.
- On the Task tab in the right auxiliary pane, click SSL Proxy.
- In the SSL Proxy dialog, configure the options as below:
- HTTPS access audit: Select the Enable check box
- Method: Only audit websites in the following list
- Website: Add CommonNames of www.gmail.com, including www.google.com, *.mail.google.com, *.google.com, www.googleadservices.com, *.google-analytics.com, and mail.google.com.
- Click Set for User. In the Audit User Configuration dialog, configure options as below:
- Method: Only audit users in the following list
- Type: Src address
- User: Address entry
- Address entry: Any. Click Add to add it to the system.
- Click OK to save the settings and return to the SSL Proxy dialog.
- Click OK to save the settings and close the SSL Proxy dialog.
Step 4: Configure the email filter rule.
- On the Navigation pane, click Configure > Content > Email Filter to visit the email filter page.
- Click New. In the Email Filter Rule Configuration dialog, configure the options as below:
- Name: gmailcontrol
- Dst zone: untrust
- User: Any
- Control type: Specific mail items
- Block/Audit email content: Select the check box
- Click email content. In the Email Content dialog, click New and configure the options in the Keyword Category Configuration dialog as below:
- Category: gmail-keyword
- Click New
- Keyword: X, Simple
- Trust value: 100. Click Add.
- Click OK to save the settings and return to the Email Content dialog.
- In the Email Content dialog, select the Block and Log check boxes of gmail-keyword.
- Click OK to save the settings and return to the Email Filter Rule Configuration dialog.
- Click Controlled Mailbox.
- In Controlled Mailbox dialog, make sure that gmail is checked.
- Click OK to save the settings and return to the Email Filter Rule Configuration dialog.
- Click OK to save the settings and return to the Email Filter page.
- Adjust the priority of the rule gmailcontrol if there are more than one email filter rules configured.

