NAT Configuarion Example
This section describes a typical NAT configuration example.
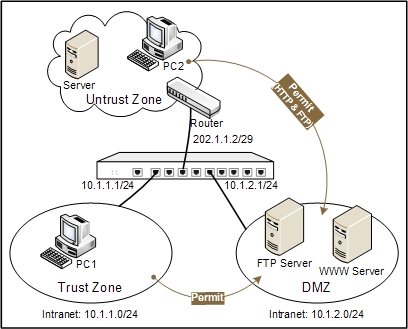
The company network is divided into three zones: Trust Zone, DMZ Zone and Untrust Zone. Staff work in the Trust zone, they are allocated with the private network segment of 10.1.1.0/24 and get the highest security priority; WWW server and FTP server are in the DMZ zone, they are allocated with the private network segment of 10.1.2.0/24 and can be accessed by internal staff and external users; external networks are in the Untrust zone. See the topology below:
There are two requirements:
- Requirement1: Staff in segment 10.1.1.0/24 in the trust zone are able to access the Internet, while PC in other segments of the zone cannot access the Internet. The legitimate IP address range provided to access the external network is 202.1.1.3 to 202.1.1.5. Because there are not enough public network addresses, NAT address multiplexing function is needed.
- Requirement2: Two internal servers are provided for users to access from the external networks, including a FTP server (the internal IP address is 10.1.2.2, port number is 21) and a WWW server (the internal IP address is 10.1.2.3, port number is 80); external mapping IP address is 202.1.1.6.
Take the following steps:
Step 1: Configure zones and interfaces.
- On the Navigation pane, click Configure > Network > Network to visit the Network page.
- Select ethernet0/1 from the interface list, and click Edit.
- In the Interface Configuration dialog, modify according to your need:
- Binding type: Layer 3 zone
- Zone: trust
- Type: Static IP
- IP address: 10.1.1.1
- Netmask: 24
- Click OK to save your settings and return to the Network page.
- Select ethernet0/2 from the interface list, and click Edit.
- In the Interface Configuration dialog, modify according to your need:
- Binding type: Layer 3 zone
- Zone: untrust
- Type: Static IP
- IP address: 202.1.1.2
- Netmask: 29
- Click OK to save your settings and return to the Network page.
- Select ethernet0/3 from the interface list, and click Edit.
- In the Interface Configuration dialog, modify according to your need:
- Binding type: Layer 3 zone
- Zone: dmz
- Type: Static IP
- IP address: 10.1.2.1
- Netmask: 24
- Click OK to save your settings and return to the Network page.
Step 2: Configure address entries.
- Select Objects > Address Book from the menu bar.
- Click New. In the Address Entry Configuration dialog, configure the options as below:
- Name: addr1
- Member: select and type IP/netmask, 10.1.1.1, 24 in turn, and click Add
- Click OK to save your settings and return to the Address Book dialog.
- Repeat the above steps to create the address entry named addr2, the member is IP range of 202.1.1.3 - 202.1.1.5.
- Repeat the above steps to create the address entry named test1, the member is IP/Netmask of 202.1.1.6/32.
- Repeat the above steps to create the address entry named test2, the member is IP/Netmask of 10.1.2.2/32.
- Repeat the above steps to create the address entry named test3, the member is IP/Netmask of 10.1.2.3/32.
Step 3: Configure policy rules.
- On the Navigation pane, click Configure > Security > Policy to visit the Policy page.
- Click New. In the Policy Configuration dialog, configure the options as below:
- Src zone: trust
- Dst zone: untrust
- Src address: addr1
- Dst address: Any
- Service: Any
- Action: Permit
- Click OK to save your settings. The system will generate a policy rule whose ID is 1.
- Click New. In the Policy Configuration dialog, configure the options as below:
- Src zone: trust
- Dst zone: dmz
- Src address: Any
- Dst address: Any
- Service: Any
- Action: Permit
- Click OK to save your settings. The system will generate a policy rule whose ID is 2.
- Click New. In the Policy Configuration dialog, configure the options as below:
- Src zone: untrust
- Dst zone: dmz
- Src address: Any
- Dst address: Any
- Service: HTTP
- Action: Permit
- Click OK to save your settings. The system will generate a policy rule whose ID is 3.
- Click New. In the Policy Configuration dialog, configure the options as below:
- Src zone: untrust
- Dst zone: dmz
- Src address: Any
- Dst address: Any
- Service: FTP
- Action: Permit
- Click OK to save your settings. The system will generate a policy rule whose ID is 4.
Step 4: Configure NAT rules.
- On the Navigation pane, click Configure > Network > NAT to visit the SNAT page.
- Click New. In the SNAT Configuration dialog, configure the options as below:
- VRouter: trust-vr
- Src address: Address entry, addr1
- Dst address: Address entry, Any
- Egress: Egress interface, ethernet0/2
- NAT address: Specified IP
- IP: Address entry, addr2
- Mode: Dynamic port, Sticky
- Click OK. The system will create a SNAT rule, and return to the SNAT page.
- Click the DNAT tab to visit the DNAT page.
- Click New > Port Mapping.
- In the Port Mapping Configuration dialog, configure the options as below:
- VRouter: trust-vr
- Dst address: Address entry, test1
- Service: FTP
- Dst address: Address entry, test2
- Dst port: 21
- Click OK. The system will create a DNAT rule, and return to the DNAT page.
- Click New > Port Mapping.
- In the Port Mapping Configuration dialog, configure the options as below:
- VRouter: trust-vr
- Dst address: Address entry, test1
- Service: HTTP
- Dst address: Address entry, test3
- Dst port: 80
- Click OK. The system will create a DNAT rule and return to the DNAT page.