IM Control Configuration Example
This section describes an IM control configuration example.
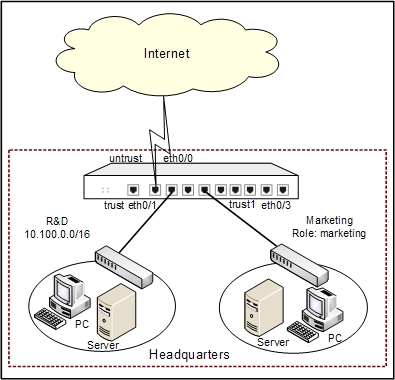
Security Appliance works as the gateway of an enterprise. Ethernet0/0 connects to Internet and belongs to untrust zone; ethernet0/1 connects to the Intranet of R&D department and belongs to trust zone; ethernet0/3 connects to the Intranet of Marketing department and belongs to the trust1 zone.
It is required to record the MSN login/logout log messages of the marketing department.
See the topology below:
This section describes the IM control and role configurations in detail. For the configurations about interface, zone, and log, see the related chapters.
Configurations
Take the following steps:
Step 1: Configure user, role, and role mapping rule (take user1 as the example).
- Select Object > Local User from the menu bar.
- In the Local User dialog, select local from the Local server drop-down list, and click New > User. In the User Configuration dialog, configure the options as below:
- Name: user1
- Password: 123456
- Confirm password: 123456
- Click OK to save the changes and return to the Local User dialog.
- Click New > User Group. In the User Group Configuration dialog, configure the options as below:
- Name: usergroup1
- Select the check box of user1 in the Available list
- Click OK to save the changes and return to the Local User dialog.
- Click OK in the Local User dialog.
Step 2: Configure the role mapping rule.
- Click Object > Role from the menu bar.
- In the Role dialog, click New > Role.
- In the Role Configuration dialog, type marketing into the Role name box.
- Click OK to save the changes and return to the Role dialog.
- Click New > Role Mapping. In the Role Mapping Configuration dialog, configure the options as below:
- Name: role-mapping1
- Member: Select marketing, User group, and usergroup1 in turn, and then click Add.
- Click OK to save the changes and return to the Role Mapping Configuration dialog.
- Click OK in the Role Mapping Configuration dialog.
- Click Object > AAA Server from the menu bar.
- In the AAA Server dialog, select local from the list, and then click Edit.
- Select role-mapping1 from the Role mapping rule drop-down list.
- Click OK to save the changes and close the dialog.
Step 3: Configure interfaces and zones.
- On the Navigation pane, click Configure > Network > Network to visit the Network page.
- Select ethernet0/1 from the interface list, and click Edit. In the Interface Configuration dialog, configure the options as below:
- Binding zone: Layer 3 zone
- Zone: trust1
- Type: Static IP
- IP address: 192.168.1.1
- Netmask: 16
- Click OK to save the changes and return to the Network page.
- Select ethernet0/0 from the interface list,, and click Edit. In the Interface Configuration dialog, configure the options as below:
- Binding zone: Layer 3 zone
- Zone: untrust
- Type: Static IP
- IP address: 66.1.200.1
- Netmask: 16
- Click OK to save the changes and return to the Network page.
Step 4: Enable WebAuth.
- On the Navigation pane, click Configure > Network > WebAuth to visit the WebAuth page.
- On the Task tab of the right pane, click WebAuth Wizard.
- In the Parameter page of the WebAuth Configuration Wizard dialog, select HTTP for the Authentication mode option, and specify the HTTP port as 8181 in the HTTP port box.
- Click Next.
- In the Auth User page, select local from the AAA server drop-down list.
- Click Next to go to the Policy page. Do the options as below:
- Src zone: trust1
- Dst zone: untrust
- DNS zone: untrust
- Click OK to save the changes and return to the WebAuth page.
- On the Navigation pane, click Configure > Security > Policy to visit the Policy page.
- Select the policy rule whose action is WebAuth, and click Edit. In the Policy Configuration dialog, select New addressbook from the Src address drop-down list.
- In the Address Entry Configuration dialog, configure the options as below:
- Name: addressentry1
- Member: Select IP/netmask, and type 192.168.1.1 and 16 into the boxes. Click Add.
- Click OK to save the changes and return to the Policy Configuration dialog.
- Click OK to save the changes and close the Policy Configuration dialog.
Step 5: Configure the IM control rule named imcontrol.
- On the Navigation pane, click Configure > Content > IM Control to visit the IM Control page.
- Click New.
- In the IM Control Rule Configuration dialog, type imcontrol into the Name box.
- Under Match Conditions, finish the options as below to specify the conditions for the rule.
- Dst zone: untrust
- User: marketing
- Schedule: Do not configure
- Select the Record log check box of the Other MSN accounts option.
- Click OK to save the changes and return to the IM Control page.
After finishing the above configurations, the MSN login/logout action of the marketing department will be recorded by log messages.