Example 2 (USB Key)
This section describes a SCVPN example with the USB KEY authentication method.
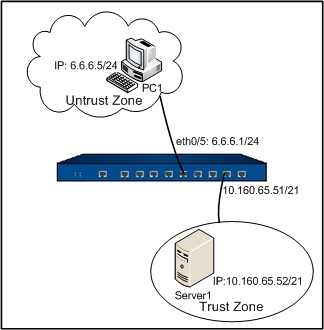
Server1 (10.160.65.52/21) in the intranet is protected by a Hillstone device. PC1 (6.6.6.5/24) in Internet wants to visit the resources on Server1 (10.160.65.52/21). It is required to control the access by encrypting the data by SCVPN with the USB KEY authentication method. As long as the UKey of the client supports standard Windows SDK (Certificate Store Functions) and the stored certificate is valid, the client can log in. Here take the Hillstone UKey as the example.
The topology is shown as below:
Preparations
Before using the USB Key, make the following preparations:
- Make the certificate and the corresponding CA certificate ready;
- Make the Hillstone UKey and the corresponding disk ready;
- Import the certificate into the UKey using Hillstone UKey manager.
Configurations
Take the following steps:
Step 1: Create local users.
- Select Objects > Local User from the menu bar.
- Select local from the Local server drop-down list. Click New > User. In the User Configuration dialog, configure the options as below:
- Name: user1
- Password: hillstone
- Confirm password: hillstone
- Click OK to save the settings.
Step 2: Configure the PKI trust domain.
- Select Objects > PKI from the menu bar.
- In the PKI Management dialog, click the Trust Domain tab. Click New. In the PKI Configuration dialog, configure the options as below:
- Trust domain: stone
- Enrollment type: Manual enrollment
- Click Next. Click Browse to locate the CA certificate and then click Import.
- Click Next. Select Default-Key from the Key pair drop-down list.
- Click Next.
- Click OK to save the settings.
Step 3: Configure the SCVPN address pool.
- On the Navigation pane, click Configure > Network > SSL VPN to visit the SSL VPN page.
- On the Task tab in the right auxiliary pane, click Address Pool to visit the Address pool page.
- Click New. On the Basic tab in the Address Pool Configuration, configure the options as below:
- Name: pool1
- Start IP: 20.1.1.1
- End IP: 20.1.1.100
- Netmask: 255.255.255.0
- DNS1: 20.1.1.3
- WINS1: 20.1.1.2
- Click OK to save the settings.
Step 4: Create the tunnel interface (the IP address of the tunnel interface must be in the same network segment with the address pool).
- On the Navigation pane, click Configure > Network > Network to visit the Network page.
- Click New on the upper-left of the zone list. In the Zone Configuration dialog, configure the options as below:
- Name: VPN
- Type: Layer 3 zone
- Click OK to save the settings and return to the Network page.
- Click New > Tunnel Interface on the upper-left of the interface list. On the General tab in the Interface Configuration dialog, configure the options as below:
- Name: tunnel1
- Binding zone: Layer 3 zone
- Zone: VPN
- Type: Static IP
- IP address: 20.1.1.101
- Netmask: 24
- Click OK to save the settings.
Step 5: Configure the SCVPN server.
- On the Navigation pane, click Configure > Network > SSL VPN to visit the SSL VPN page.
- Click New.
- In the Welcome page of the SSL VPN Configuration dialog, Type ssl1 into the SSL VPN name box.
- Click Next. In the User page, select local from the AAA server drop-down list, and then click Add.
- Click Next. In the Interface page, configure the options as below:
- Interface 1: ethernet0/5
- Service port: 4433
- Tunnel interface: tunnel1
- Address pool: pool1
- Click Next. In the Policy/Route page, type 10.160.64.0 and 255.255.248.0 into the IP and Netmask boxes respectively, and then click Add.
- Click Advanced, and in the Client page, configure the options as below:
- Authentication: Enable
- Trust domain: Select stone from the drop-down list, and then click Add.
- Click OK to save the settings.
Step 6: Edit the policy rule from VPN to Any.
- On the Navigation pane, click Configure > Security > Policy to visit the Policy page.
- Select VPN and Any from the Src zone and Dst zone drop-down list respectively. Select the filtered policy rule, and click Edit. In the Policy Configuration dialog, modify Dst zone from Any to trust.
- Click OK to save the changes.
Step 7: In the web browser of PC1, visit https://6.6.6.1:4433, and in the login page, type user1 and hillstone into the Username and Password boxes respectively. After the authentication, download and install Secure Connect.
Step 8: Operations in the client.
- Install Hillstone UKey driver on the client PC.
- Insert the UKey.
- Start the SCVPN client. Click Mode. In the Login Mode dialog, select Username/Password + Digital Certificate; Click Select Cert, and in the Select Certificate dialog, select Use USB-Key Certificate.
- In the SCVPN client Login dialog, fill each option as below and click Login:
- Server: 6.6.6.1
- Port: 4433
- Username: user1
- Password: hillstone
- PIN: 1111 (the default value)