Host Check Configuration Example
This section describes a SCVPN host check configuration example.
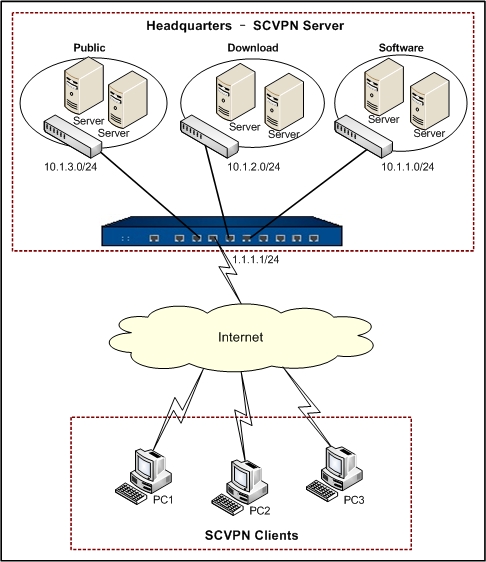
A hillstone device works as the SCVPN server for an enterprise. It is required to meet the following requirements:
- Clients access headquarters resources with SCVPN.
- Resources in the software network segment (10.1.1.0/24) can be accessed by role sw only; resources in the downloading network segment (10.1.2.0/24) can be accessed by role dl; and resources in public network segment (10.1.3.0/24) can be accessed by all users.
- Perform host security check to the clients and control the resources access based on the check results.
The topology is shown as below:
Take the following steps:
Step 1: Create local users.
- Select Objects > Local User from the menu bar.
- Select local from the Local server drop-down list. Click New > User. In the User Configuration dialog, configure the options as below:
- Name: pc1
- Password: xxxfcvg236
- Confirm password: xxxfcvg236
- Click OK to save the settings and return to the Local User dialog.
- Repeat Step 2-3 to create the user named pc2 with the password xcabuv112 and pc3 with the password xacfomg763.
- Click OK to save the settings.
Step 2: Configure the roles and role-mapping rules.
- Select Objects > Role from the menu bar.
- Click New > Role. In the Role Configuration dialog, configure the options as below:
- Click OK to save the settings and return to the Role Configuration dialog.
- Repeat Step 2-3 to create the role named dl.
- Click New > Role Mapping. In the Role Mapping Configuration dialog, configure the options as below:
- Name: rule1
- Member: Select sw, User, pc1 from the drop-down list in turn, and click Add. Use the same way to add dl, User, pc1, and dl, User, pc2.
- Click OK to save the settings and return to the Role dialog. Click Close.
- Select Objects > AAA Server from the menu bar.
- In the AAA Server dialog, select local from the AAA server list, and click Edit.
- In the Local Server Configuration dialog, select rule1 from the Role mapping rule drop-down list.
- Click OK to save the settings.
Step 3: Configure the egress interface of SCVPN server.
- On the Navigation pane, click Configure > Network > Network to visit the Network page.
- Select ethernet0/1 from the interface list, and click Edit. On the General tab in the Interface Configuration dialog, configure the options as below:
- Binding zone: Layer 3 zone
- Zone: untrust
- Type: Static IP
- IP address: 1.1.1.1
- Netmask: 255.255.255.0
- Click OK to save the changes.
Step 4: Configure the host check profiles.
- On the Navigation pane, click Configure > Network > SSL VPN to visit the SSL VPN page.
- On the Task tab in the right auxiliary pane, click Host Check to visit the Host Check page.
- Click New. In the Host Checking Configuration dialog, configure the options as below:
Basic
- Name: dl-security-check
- OS version: At least, Win2003, None
- Patch 1: KB958215
- Lowest IP version: IE6.0
- Lowest IP security level: High
Advanced
- Security center: Must
- Anti-Virus software: Installed, Monitor, Virus signature DB update
- Anti-Spyware software: Installed, Monitor, Signature DB update
- Firewall: Installed, Monitor
- Click OK to save the settings and return to the SSL VPN page.
- Repeat Step 3-4 to create the profile named sw-security-check. The profile contents are:
Basic
- Name: sw-security-check
- OS version: Must match, WinXP, SP3
- Patch 1: KB921883
- Lowest IP version: IE7.0
- Lowest IP security level: High
Advanced
- Security center: Must
- Auto update: Must
- Anti-Virus software: Installed, Monitor, Virus signature DB update
- Anti-Spyware software: Installed, Monitor, Signature DB update
- Firewall: Installed, Monitor
- File path name: File 1: Exist, C:\Program Files\McAfee\VirusScan\Enterprise.exe
- Click OK to save settings.
Step 5: Configure the SCVPN address pool.
- On the Navigation pane, click Configure > Network > SSL VPN to visit the SSL VPN page.
- On the Task tab in the right auxiliary pane, click Address Pool to visit the Address pool page.
- Click New. On the Basic tab in the Address Pool Configuration dialog, configure the options as below:
- Name: pool1
- Start IP: 11.1.1.10
- End IP: 11.1.1.100
- Netmask: 255.255.255.0
- DNS1: 11.1.1.3
- WINS1: 11.1.1.2
- Click OK to save the settings.
Step 6: Create the tunnel interface (the IP address of the tunnel interface must be in the same network segment with the address pool).
- On the Navigation pane, click Configure > Network > Network to visit the Network page.
- Click New on the upper-left of the zone list. In the Zone Configuration dialog, configure the options as below:
- Name: VPN
- Type: Layer 3 zone
- Click OK to save the settings and return to the Network page.
- Click New > Tunnel Interface on the upper-left of the interface list. On the General tab in the Interface Configuration dialog, configure the options as below:
- Name: tunnel1
- Binding zone: Layer 3 zone
- Zone: VPN
- Type: Static IP
- IP address: 11.1.1.1
- Netmask: 24
- Click OK to save the settings.
Step 7: Configure SCVPN server.
- On the Navigation pane, click Configure > Network > SSL VPN to visit the SSL VPN page.
- Click New.
- In the Welcome page of the SSL VPN Configuration dialog, Type ssl1 into the SSL VPN name box.
- Click Next. In the User page, select local from the AAA server drop-down list, and then click Add.
- Click Next. In the Interface page, configure the options as below:
- Interface 1: ethernet0/1
- Service port: 4433
- Tunnel interface: tunnel1
- Address pool: pool1
- Click Next. In the Policy/Route page, add the following routes (in the order of IP, netmask, metric):
- 10.1.1.0, 255.255.255.0, 10
- 10.1.2.0, 255.255.255.0, 5
- 10.1.3.0, 255.255.255.0, 3
- Click Advanced, and in the Host Security page, add the following two host check rules:
- Role: sw; Host checking name: sw-security-check; Guest role: dl. Click Add.
- Role: Default; Host checking name: dl-security-check; Guest role: Null; Periodic checking: 50. Click Add.
- Click OK to save the settings.
Step 8: Configure the policy rule from VPN to Any.
- Select Objects > Address Book from the menu bar.
- In the Address Book dialog, click New. In the Address Entry Configuration dialog, configure the options as below:
- Name: swnetwork
- Member: IP/netmask, 10.1.1.0, 24. Click Add.
- Click OK to save the settings.
- Repeat Step 2-3 to create the address entry named dlnetwork. Configure the options as below:
- Name: dlnetwork
- Member: IP/netmask, 10.1.2.0, 24. Click Add.
- Repeat Step 2-3 to create the address entry named publicnetwork. Configure the options as below:
- Name: publicnetwork
- Member: IP/netmask, 10.1.3.0, 24. Click Add.
- Click Close.
- On the Navigation pane, click Configure > Security > Policy to visit the Policy page.
- Select VPN and Any from the Src zone and Dst zone drop-down list respectively. Select the filtered policy rule, and click Edit. In the Policy Configuration dialog, modify the options as below:
- Click OK to save the settings and return to the Policy page.
- Select VPN and trust from the Src zone and Dst zone drop-down list respectively. Select the filtered policy rule, and click Edit. In the Policy Configuration dialog, modify the options as below:
- Click OK to save the settings and return to the Policy page.
- Select VPN and trust from the Src zone and Dst zone drop-down list respectively. Select the filtered policy rule, and click Edit. In the Policy Configuration dialog, modify the options as below:
- Src zone: VPN
- Src address: Any
- Dst zone: trust
- Dst address: publicnetwork
- Service: Any
- Action: Permit
- Click OK to save the settings.
After finishing the above configurations, when the client connects the server, the server will check the host based on the configured host check profile, and assign the corresponding access right according to the check result. The following list shows the relationship between the host check rule and the access right:
| User |
Host check rule |
Check result and access right |
| Successful |
Failed |
| pc1 |
Role: sw
Profile: sw-security-check
Guest role: dl
Periodic: 30 minutes
|
Permit to access resources in the software network segment, and the host check will performed every 30 minutes automatically. |
Permit to access resources in the download network segment, and the host check will be performed every 30 minutes automatically. |
| pc2 |
Role: Null (the access right of the default role dl will be assigned)
Profile: dl-security-check
Guest role: Null
Periodic: 50 minutes
|
Permit to access resources in the download network segment, and the host check will be performed every 50 minutes automatically. |
Disconnect. |
| pc3 |
Role: Null
Profile: dl-security-check
Guest role: Null
Periodic: 50 minutes
|
Permit to access resources in the public network segment, and the host check will be performed every 50 minutes automatically. |
Disconnect. |