WLAN Configuration Example
This section describes the configuration example of WLAN.
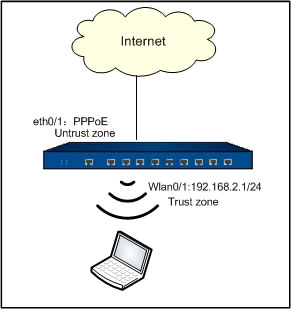
Create a WLAN through the Hillstone device and ensure the users can access the LAN through wireless mode. The Hillstone device uses the routing mode. The ethernet0/1 uses the PPPoE mode to dial up and creates the WLAN whose SSID is test.

Step 1: Configure the interface and the security zone.
- On the Navigation pane, click Configuration > Network > Network to visit the Network page.
- Select the ethernet0/1 interface and then click Edit. In the pop-up window, configure the following settings.
- Binding zone - Layer 3 zone
- Zone - Select untrust from the drop-down menu
- Type - PPPoE
- Username - PPPoE-user
- Password - 123456
- Confirm password - 123456
- Click OK to save the settings.
- Select the wlan1 interface and then click Edit. In the pop-up window, configure the following settings:
- Binding zone - Layer 3 zone
- Zone - Select trust from the drop-down menu
- Type - Static IP.
- IP address - 192.168.2.1
- Netmask - 255.255.255.0
- Select the Enable DNS checkbox.
- Click DHCP. In the pop-up window, configure the following settings:
- Type - DHCP server
- Gateway - 192.168.2.1
- Netmask - 255.255.255.0
- DNS1 - 192.168.2.1
- Start IP - 192.168.2.2
- End IP - 192.168.2.254
- Click Add.
- Click OK to save the configurations and return to the Interface Configuration page.
- Click OK to save the configurations and return to the Network page.
Step 2: Configure the DNS proxy.
- On the Navigation pane, click Configuration > Network > Network to visit the Network page.
- Click DNS in the right Task pane. The DNS List dialog appears.
- With the Server and Proxy tab active, click New in the DNS proxy section. The DNS Proxy Configuration pop-up appears.
- Configure the following settings the pop-up window.
- Domain type - Any domain
- Domain server - Use system config
- Click OK to save the configurations and close the dialog.
Step 3: Configure NAT rules.
- On the Navigation pane, click Configuration > Network > NAT to visit the NAT page.
- With the SNAT tab active, click New. In the pop-up SNAT Configuration dialog, configure the following settings:
- VR - trust-vr
- Src address - Select Address entry and any.
- Dst address - Select Address entry and any.
- Egress - Select Egress interface and ethernet0/1.
- Sticky - Select Enable.
- Click OK to save the configurations. The system will generate a SNAT rule whose ID is 1.
Step 4: Configure policy rules.
- On the Navigation pane, click Configuration > Security > Policy to visit the NAT page.
- Click New. The Policy Configuration window appears.
- Configure the following settings:
- Src zone - trust
- Dst zone - untrust
- Src address - Any
- Dst address - Any
- Service - Any
- Action - Permit
- Click OK to save the configurations.
Step 5: Configure the AAA server.
- Select AAA Server from the Objects drop-down menu. The AAA Server dialog appears.
- Click New and select Radius Server. In the pop-up Radius Server Configuration dialog, configure the following settings:
- Server name - radius1
- Server address - 202.10.1.2
- VR - trust-vr
- Port - 1812
- Password - 123456
- Confirm password - 123456
- Click OK to save the modifications.
Step 6: Configure the WLAN settings. Use the WPA2-PSK security mode as the example.
- On the Navigation pane, click Configuration > Network > WLAN to visit the WLAN page.
- Select the Enable checkbox and then click Apply.
- Configure the following settings:
- SSID - test
- WLAN Interface - Select wlan0/1 from the drop-down menu.
- SSID broadcast - Select Enable.
- Security mode - Select WPA2-PSK from the drop-down menu.
- Data encryption - Select CCMP from the drop-down menu.
- Pre-shared key - hillstone123
- Maximum users - 64
- User isolation - Select Enable.
- Click OK to save the configurations.
Step 7: Configure the WLAN settings. Use the WPA2 security mode as the example.
- On the Navigation pane, click Configuration > Network > WLAN to visit the WLAN page.
- Select the Enable checkbox and then click Apply.
- Configure the following settings:
- SSID - test
- WLAN Interface - Select wlan0/1 from the drop-down menu.
- SSID broadcast - Select Enable.
- Security mode - Select WPA2 from the drop-down menu.
- Data encryption - Select CCMP from the drop-down menu.
- Pre-shared key - hillstone123
- Maximum users - 64
- User isolation - Select Enable.
- Authentication server - Select radius1 from the drop-down menu.
- Click OK to save the configurations.

