HA Configuration Example: Active-Active (A/A) Mode
This section describes a typical HA Active-Active mode configuration example.
Before configuring, make sure the two security devices constructing the HA typical structure are using the same hardware platform, firmware version, both have enabled VR and anti-virus functions, been installed with anti-virus licenses, and the two devices use the same interface to connect to the network.
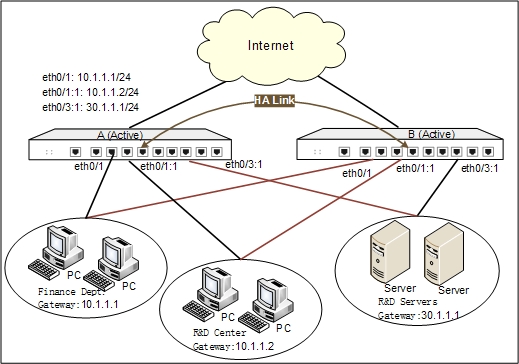
After completing the configuration, the two devices all enable HA function. Device A is selected as the primary device of HA group0, and synchronizates information to Device B. And Device B will preempt to be the primary device of HA group1. Under normal conditions, Device A and Device B run their own work independently, Device A forwarding the traffic of Finance Department and R&D Center, Device B forwarding the traffic of R&D servers. If one of the two devices fails, the other can take over its work and go on forwarding traffic without interruption. For example, if Device B fails, Device A will forward the traffic of Finance Department, R&D Center and R&D servers.
See the topology below:
Take the following steps:
Step 1: Configure track objects which are used for tracking the status of interface of Device A and B, and if the interface fails, the device will implement faillover.
Device A
- Select Objects > Track Object from the menu bar.
- In the Track Object dialog, click New.
- In the Track Object Configuration dialog, configure the options as below:
- Name: group0
- Threshold: 255
- Type: Select Interface and then click Add
- Interface: ethernet0/0
- Weight: 255
- Click OK and return to the Track Object dialog.
- Repeat step 2 to step 3 to create another track object, whose name is group1, threshold is 255, type is Interface, name of interface is ethernet0/1:1 and ethernet0/3:1, weight of interface is 255.
Device B: Do the same configurations:
- Create a track object, whose name is group0, threshold is 255, type is Interface, name of interface is ethernet0/0, weight of interface is 255.
- Create a track object, whose name is group1, threshold is 255, type is Interface, name of interface is ethernet0/1:1 and ethernet0/3:1, weight of interface is 255.
Step 2: Configure HA groups.
Device A
- Select System > HA from the menu bar.
- Under the Group0 in the HA dialog, configure the options as below:
- Priority: 10
- Preempt: 1
- Track Object: group0
- Click
 to configure HA group1 as below:
- Preempt: 60
- Track Object: group1
- Click OK to save your settings.
Device B
- Select System > HA from the menu bar.
- Under the Group0 in the HA dialog, configure the options as below:
- Priority: 200
- Preempt: 60
- Gratuitous ARP packet number: 3
- Track Object: group0
- Click to configure HA group1 as below:
- Priority: 20
- Preempt: 1
- Gratuitous ARP packet number: 3
- Track Object: group1
- Click OK to save your settings.
Step 3: Configure interfaces and zones of Device A.
- On the Navigation pane, click Configure > Network > Network to visit the Network page.
- Click New on the upper-left of the zone list.
- In the Zone Configuration dialog, type yanfa into the Name box.
- Click OK to save your settings and return to the Network page.
- Repeat the above steps to create more zones: caiwu, internet and server.
- Select ethernet0/0 from the interface list, and click Edit.
- In the Interface Configuration dialog, configure the options as below:
- Binding zone: Layer 3 zone
- Zone: internet
- Type: Static IP
- IP address: 192.168.1.1
- Netmask: 255.255.255.0
- Click OK to save the changes and return to the Network page.
- Select ethernet0/1 from the interface list, and click Edit.
- In the Interface Configuration dialog, configure the options as below:
- Binding zone: Layer 3 zone
- Zone: caiwu
- Type: Static IP
- IP address: 10.1.1.1
- Netmask: 255.255.255.0
- Click OK to save the changes and return to the Network page.
- Select New > Virtual Forward Interface from the interface list.
- In the Interface Configuration dialog, configure the options as below:
- Name: ethernet0/0:1
- Binding zone: Layer 3 zone
- Zone: internet
- Type: Static IP
- IP address: 192.168.1.2
- Netmask: 255.255.255.0
- Click OK to save the changes and return to the Network page.
- Select New > Virtual Forward Interface from the interface list. In the Interface Configuration dialog, configure the options as below:
- Name: ethernet0/1:1
- Binding zone: Layer 3 zone
- Zone: yanfa
- Type: Static IP
- IP address: 10.1.1.2
- Netmask: 255.255.255.0
- Click OK to save the changes and return to the Network page.
- Select New > Virtual Forward Interface from the interface list. In the Interface Configuration dialog, configure the options as below:
- Name: ethernet0/3:1
- Binding zone: Layer 3 zone
- Zone: server
- Type: Static IP
- IP address: 30.1.1.1
- Netmask: 255.255.255.0
- Click OK to save the changes and return to the Network page.
Step 4: Configure the Routing function on Device A.
- On the Navigation pane, click Configure > Network > Routing to visit the Destination Route page.
- Click New. In the Destination Route Configuration dialog, configure the options as below:
- Destination: 0.0.0.0
- Subnet mask: 0
- Next hop: Interface
- Interface: ethernet0/0
- Gateway: 192.168.1.200
- Click OK to save your settings and return to the Destination Route page.
- Click New. In the Destination Route Configuration dialog, configure the options as below:
- Destination: 0.0.0.0
- Subnet mask: 0
- Next hop: Interface
- Interface: ethernet0/0:1
- Gateway: 192.168.1.200
- Click OK to save your settings.
Step 5: Configure SNAT on Device A.
- Select Objects > Address Book from the menu bar.
- Click New. In the Address Entry Configuration dialog, configure the options as below:
- Name: caiwu
- Member: Select and type IP/netmask, 10.1.1.1, 24 in turn, and click Add
- Click OK to save your settings and return to the Address Book dialog.
- Click New. In the Address Entry Configuration dialog, configure the options as below:
- Name: yanfa
- Member: Select and type IP/netmask, 10.1.1.2, 24 in turn, and click Add
- Click OK to save your settings and return to the Address Book dialog.
- Click New. In the Address Entry Configuration dialog, configure the options as below:
- Name: server
- Member: Select and type IP/netmask, 30.1.1.1, 24 in turn, and click Add
- Click OK to save your settings and return to the Address Book dialog.
- On the Navigation pane, click Configure > Network > NAT to visit the SNAT page.
- Click New.
- In the SNAT Configuration dialog, configure the options as below:
- Src address: Address entry, caiwu
- Dst address: Address entry, Any
- Egress: Egress interface, ethernet0/0
- NAT address: Egress IF IP
- HA group: Click 0 on the Advanced tab
- Click OK to save your settings and return to the SNAT page.
- Click New.
- In the SNAT Configuration dialog, configure the options as below:
- Src address: Address entry, yanfa
- Dst address: Address entry, Any
- Egress: Egress interface, ethernet0/0:1
- NAT address: Egress IF IP
- HA group: Click 1 on the Advanced tab
- Click OK to save your settings and return to the SNAT page.
Step 6: Configure policy rules on Device A.
- On the Navigation pane, click Configure > Security > Policy to visit the Policy page.
- Click New. In the Policy Configuration dialog, configure the options as below:
- Src zone: caiwu
- Dst zone: internet
- Src address: caiwu
- Dst address: Any
- Service: Any
- Action: Permit
- Click OK to save your settings and return to the Policy page.
- Click New. In the Policy Configuration dialog, configure the options as below:
- Src zone: yanfa
- Dst zone: internet
- Src address: yanfa
- Dst address: Any
- Service: Any
- Action: Permit
- Click OK to save your settings and return to the Policy page.
- Click New. In the Policy Configuration dialog, configure the options as below:
- Src zone: yanfa
- Dst zone: server
- Src address: yanfa
- Dst address: server
- Service: Any
- Action: Permit
- Click OK to save your settings and return to the Policy page.
Step 7: Configure HA link interfaces and enable HA.
Device A
- Select System > HA from the menu bar.
- In the HA dialog, configure the options as below:
- Link interface 1: ethernet0/4
- IP address: 100.0.0.1/24
- HA cluster ID: 1
- Click OK to save your changes.
Device B
- Select System > HA from the menu bar.
- In the HA dialog, configure the options as below:
- Link interface 1: ethernet0/4
- IP address: 100.0.0.100/24
- HA cluster ID: 1
- Click OK to save your changes.