802.1X Configuration Example
This section describes a typical 802.1X configuration example.
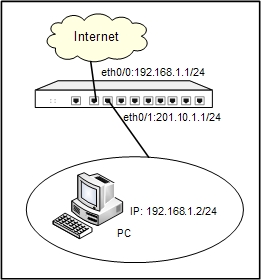
You need to configure 802.1X to control users who access the Internet through device, using MAC-based 802.1X authentication, and the authentication server is local. If the authentication is passed, system will allow users to access to the network through port ethernet0/0, otherwise prohibit their access. See the topology below:

Take the following steps:
Step 1: Create a user.
- Select Objects > Local User from the menu bar.
- In the Local User dialog, select local from the Local server drop-down list, and click New > User.
- In the User Configuration dialog, configure the options as below:
- Name: user1
- Password: password1
- Confirm password: password1
- Click OK to save the settings and return to the Local User dialog.
Step 2: Create a role and a role mapping rule.
- Select Objects > Role from the menu bar.
- In the Role dialog, click New > Role.
- In the Role Configuration dialog, type role1 into the Role name box.
- Click OK to save the settings and return to the Role dialog.
- Click New > Role Mapping. In the Role Mapping Configuration dialog, configure the options as below:
- Name: test
- Member: Select role1, user, and user1 in turn, and then click Add.
- Click OK to save the settings and return to the Role Mapping Configuration dialog.
- Click OK in the Role Mapping Configuration dialog.
Step 3: Configure AAA servers.
- Select Objects > AAA Server from the menu bar.
- In the AAA Server dialog, select local from the list, and then click Edit.
- In the Local Server Configuration dialog, select test from the Role mapping rule drop-down list.
- Click OK to save your changes.
- In the AAA Server dialog, click OK to save your settings.
Step 4: Configure interfaces and zones.
- On the Navigation pane, click Configure > Network > Network to visit the Network page.
- Select ethernet0/0 from the interface list, and click Edit. In the Interface Configuration dialog, configure the options as below:
- Binding zone: Layer 2 zone
- Zone: l2-trust
- Click OK to save the changes and return to the Network page.
- Select vswitchif1 from the interface list, and click Edit. In the Interface Configuration dialog, configure the options as below:
- Binding zone: Layer 3 zone
- Zone: trust
- Type: Static IP
- IP address: 192.168.1.1
- Netmask: 255.255.255.0
- Click OK to save the changes and return to the Network page.
- Select ethernet0/1 from the interface list, and click Edit. In the Interface Configuration dialog, configure the options as below:
- Binding zone: Layer 3 zone
- Zone: untrust
- Type: Static IP
- IP address: 201.10.1.1
- Netmask: 255.255.255.0
- Click OK to save the changes and return to the Network page.
Step 5: Configure a 802.1X rule.
- On the Navigation pane, click Configure > Network > 802.1X to visit the 802.1X page.
- Click New.
- In the Configuring 802.1X dialog, configure the options as follows:
- Interface: ethernet0/0
- AAA server: local
- Access mode: MAC
- Port authorized: On the Advanced tab, click Auto
- Click OK.
Step 6: Configure address entry and policy rules.
- Select Objects > Address Book from the menu bar.
- In the Address Book dialog, click New.
- In the Address Entry Configuration dialog, configure the options as below:
- Name: vswitchaddr
- Member: Select and type IP/netmask, 192.168.1.1, 255.255.255.0 in turn, and then click Add
- Click OK to save your settings, and then close the Address Book dialog.
- On the Navigation pane, click Configure > Security > Policy to visit the Policy page.
- Click New. In the Policy Configuration dialog, configure the options as below:
- Src zone: trust
- Dst zone: untrust
- Src address: vswitchaddr
- Dst address: Any
- Service: Any
- Action: Permit
- Click OK to save your settings.

